MY first 750 miles

Post Reply
Karl V

MY first 750 miles

Post by Karl V » Fri Jul 06, 2018 11:03 pm

After almost 2 weeks and 750 miles of Nomad ownership, I wanted to share a few of my thoughts and observations. I’m doing this because during my 11 month wait for the car, I was constantly craving information / stories / photos of Nomads, especially trying to learn what other owners had spec’d and liked / disliked.

SPOLIER ALERT – you won’t find any technical details or stories of power slides / rally jumps in this post. It’s just a few bland observations from my first 750 miles of A and B road driving, plus stuff that I wanted to know before ownership…

== Background ==

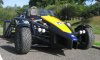
I previously owned an Atom 2 (N/A) which I sold 5 years ago and have been longing to fill the gap it left since then. The Atom was my daily drive (except in severe weather) and the plan is for the Nomad to be the same. TBH, I grew tired of the Atom as a daily drive; crashing through potholes and getting quite hot in slow moving traffic. A light shower at 40 MpH felt like acupuncture (you don’t wear a full-face helmet when popping to the shops). I know the Atom was never designed to be a daily tarmac warrior, but I am hoping the Nomad will deliver more on this front, again, knowing it was not designed for this purpose either.

AtomJPG.JPG
AtomJPG.JPG (77.16 KiB) Viewed 2392 times

== Spec ==

As a daily drive, I opted for N/A with standard suspension and the AT (50/50) tyres on 15” rally wheels. A suspension upgrade may be on the cards in the future, but let’s see how the next few months pan out.

As others have said, the N/A needs working hard to reach Atom levels of pull and there is no doubt that a SC would cater for this. So far, a downshift or two to bring the revs up to 5,000 RPM before a boot does reach N/A Atom levels of urgency (in my mind), but of course this needs a bit more input and planning before execution. The N/A is not quite as ‘urgent’.

What I did opt for though was comfort and bling – a machine that makes me grin on may way to and from the office; when ferrying the kids to and from their activities; when hitting the road at 7am on a Sunday morning before the rest of the nation is awake; when parked up and when crawling through traffic.

In the comfort corner we have side panels, custom made boot, SatNav, larger aluminium radiator to help in slower traffic. In the bling corner we have 2 x LED whips (cut to a height that means the car will fit into the garage), hydraulic handbrake, 4 spot lights, winch and a couple of bonnets that will be wrapped in different colours as the mood takes me.

IMG_20180627_140758637.jpg
IMG_20180627_140758637.jpg (227.8 KiB) Viewed 2392 times
IMG_20180627_140631086.jpg
IMG_20180627_140631086.jpg (222.3 KiB) Viewed 2392 times

== Initial thoughts ==

The huge grin of Ariel ownership is back! This time though, without flies and bugs in my teeth and small stones bouncing off my head.

Being that slightly bit higher off the ground, buses and lorries no longer try to suffocate me at traffic lights. I also don’t have to crane my neck quite so much to hear white-van man ask me how much it costs or “what it’ll do”. Most of all though, the suspension squat is amazing! It’s like a visual indicator of where the grip is currently being placed and an opportunity to make amends before your next move.

== Getting going ==

Having driven 350HP diesel cars for the past 10+ years, I have become accustom to the 550lb/ft low end torque they deliver. The N/A 2.4 engine in the Nomad easily matches that experience given the car is a 1/3 the weight of the German marques I am used to. I thought that I would be pulling away in 2nd (like in the Atom), but it really is much happier with 1st. Once the wheels are moving, 2nd takes you up to 50/60 MpH before short shifting to 4th or 5th to cruise. 6th is best for 60 MpH+ as, like I said, the N/A needs revs to deliver any useful instant power. Even at 70, you need to be in 5th, maybe even 4th, to get past quickly. All very relaxed and graceful generally. Drop it a couple gears though and the urgency is quite something. Granted, not quite as urgent as the Atom (or a SC Nomad), but I’m happy.

==On the go==

Again, that body roll; and ability to soak up bumps in the road. I love the steering feel. You can read the road surface underneath, but it just wants to track in a straight line and seemingly ignores most tram lines that I need to circumnavigate in other cars – maybe because the wheel span is quite wide?

On 15” wheels, you do have to work quite hard to get through a roundabout at pace, due to the desire to track straight, but the pliable tread blocks of the A/T rubber does a great job in feeding back grip levels. I haven’t experimented with corner acceleration / braking yet. I’ll wait for it to be run in properly before starting that little exploration…

There is a great engine burble when decelerating down to near tick-over revs. Not quite the pop and bang of overrun after hard acceleration, but sweet when you can invoke it, especially going past a pub garden on a warm summer evening. It’s a real head-turner.

== Stopping ==

I opted for Alcons at the front and Sport brakes at the rear, together with the adjustable brake bias. The Alcons bite instantly, despite the discs and pads being new. That doesn’t mean the car stops instantly! It means the you’re facing the tarmac instantly while the front suspension builds enough torsion to transfer the stopping force to the tyres. Maybe adjustable suspension here will help, but it is more likely that I need to get used to how the car works.

I have had front wheel lock-up a few times and the remote brake bias is now on 2 clicks to the rear, which seems to have helped on this particular set-up. As explained above, I haven’t really explored hard cornering / stopping during the running in period, so the 2 clicks maybe become 4 or -2 over time. Being able to adjust on the move though is great.

BTW – horrendous brake squeal from all four corners at first. After about 400 / 500 miles it mostly dies down, but at 750 miles I still have some rear squeal when the discs / pads heat up. They probably need a few more miles on them, or some copper grease…

== Wow factor==

This is, after all, why I bought the car…

Standing still, it delivers what I was hoping for. It looks like a bad-ass post-apocalypse machine. That bad-ass image dies instantly when you try to get out of the fecking thing to grab a Snickers bar from the BP garage on the A303 on the way home. You heave yourself out of the car in an undignified manner, stretch your legs and back and let out a deep sigh, waiting for your hearing to return, before doing a John Wayne swagger across the forecourt.

Getting in is easier, even in front of a crowd. You simply grab, swivel and let go – Dukes of Hazzard style. Then you realise you’re sitting on the harness and begin to excavate the buckles from ‘down below’ while on-lookers are pointing their phones at you. Doesn’t take long to get the hang of it all though. Hooking the shoulder straps over the seat makes the whole process much easier.

Belts.jpg
Belts.jpg (142.2 KiB) Viewed 2392 times

On the move, there are grins aplenty. From you as well as onlookers. You don’t have to take corners sideways to get noticed and pointed at. Yummy mummies on the school run are more receptive of the sensible driver too; allegedly…

==Best Bits==

• Hydraulic handbrake. Having the ‘parking’ handbrake in the centre (as opposed to on the right in the Atom) is much easier to use, but it is a little too far back to be useful in every day traffic (the seats pin you in quite nicely). So far, the hydraulic handbrake has been used mainly for hill starts, which is worth the money alone. It’ll be interesting to see what it does ‘on the move’ once run-in properly.

• Daytime Running Lights (DLRs). A standard part of the 2 or 4 roof mounted spot lamps. These come on with the side lights and add a menacing look being a crisp white LED light. When you find yourself in a tree covered B-road, they add a sense of presence to what is actually quite a small car, making other drivers naturally slow down and make room for you because they are not quite sure what they are seeing (to be continued below…)

• LED whips. Always on! You can’t see the glow during the day, but again, pushing on down a tree covered B-road and they, with the DLRs, make your presence known.

Whips.jpg
Whips.jpg (77.1 KiB) Viewed 2392 times

Plus, it is somewhere to mount your flags. Worry not though, when we get bored with England flags (like say… 1980), I have Union Jack flags to replace them with. Always thinking people. Always thinking…

Flags.jpg
Flags.jpg (352.51 KiB) Viewed 2392 times

==Fixed Bits==

I’ve done a bit of tweaking that was largely based on my ‘research’ while climbing up the Nomad waiting list over the past 11 months. Some of these were also based on previous Atom ownership and I knew I had to do from day 1…

• Seat belt grommets. There are 8 eye-bolts that secure the quick release harness system to the chassis. The problem I (and others) have found is that there can be quite a lot of jiggling of the harness anchors in the eye bolts which drums up a fair amount of metallic rattling. A quick and cost-effective fix is to insert rubber (or polyurethane) grommets to the eye bolts. This has been discussed in this thread viewtopic.php?f=1&t=14630. The links in the thread seem to be dead, so I tracked down the parts to here https://www.electricalcarservices.com/n ... 050/p-4028.

Grommets.jpg
Grommets.jpg (147.06 KiB) Viewed 2392 times

• Panel knock. These cars are hand made and every machine differs. On mine though, I found 2 areas where the panels where knocking against the chassis. A strip of Velcro ‘fluffy side’ https://www.halfords.com/motoring/paint ... x-1m-black has done the trick. NOTE: on the rear, I had to remove the 2 rear hex bolts, either side of the suspension strut, holding the panel to be able to access the chassis. No need to worry about your nuts dropping – they are spot-welded to the frame. The front didn’t need any unbolting.

Front.jpg
Front.jpg (176.03 KiB) Viewed 2392 times
Rear.jpg
Rear.jpg (155.89 KiB) Viewed 2392 times

• Key holder. Did this on the Atom too. A simple snap hook https://www.toolstation.com/shop/p39642 attached with a zip tie, just in front of the immobiliser loop gives me somewhere to hang the keys before flight. I attach the keys before getting in to avoid the dreaded ‘pocket wrestle’ whilst seated and it also reminds me to remove them just before getting out.

Keys.jpg
Keys.jpg (97.58 KiB) Viewed 2392 times

• Floor mats. Artificial lawn. Did this on the Atom 8 years ago too. Why bother? Well others have mentioned dirt and dust getting into the car and kicking up a fuss when setting off, which is true. Personally, I got fed up with small stones (and escaped coins!) rattling around and was forever accelerating hard or braking hard when pulling into the garage to get the stones to a place where I could remove them. Plus, you know, every car needs car mats 😉. I did see wear and tear in the Atom tub (before the ‘mats’) where your heels dig in just below the pedal box. It needed the seats out to measure / fit the ‘mats’, but I did this at the same time as the next item…

Mats.jpg
Mats.jpg (177.63 KiB) Viewed 2392 times

• Lumbar support. I have to say, the 3-hour drive home from Crewkerne on pick up day left me slightly debilitated. I have the standard seats which are mostly great, but the angle of the seats is slightly more ‘laid back’ than my aged body feels comfortable with. I found a gap at the very lower spine that was causing me to constantly shift around in the seat. I have added one of these https://www.amazon.co.uk/gp/product/B01MFAEY4C/ and it has made the world of difference. Needed the seats out to strap them in properly and I’m not yet sure what the lasting effect of rain will be, but that gap has been plugged – for now.

Lumbar.jpg
Lumbar.jpg (99.69 KiB) Viewed 2392 times

• Blind spots. Another lesson from the Atom. The mirrors are sleek and pointly, but quite flat. The difference to everyday driving with a set of these https://www.amazon.co.uk/gp/product/B079HBY8V6 has been quite astounding. Best bit – I can see the LED whips glowing at night now, as well as my grinning face. OK, maybe not a good advert… NOTE: They need to be attached to the ‘outside’ of the mirrors. I made the mistake of sticking them to the ‘inside’ and less than a minute into the first drive realised that not only dd they take up valuable usable visual space, but they also ‘messed with the mind’. Wide-angle convex lens go on the outside of mirrors. Many hours of scraping off double-sided tape and applying silicon sealant taught me that. Doh!

Mirrors.jpg
Mirrors.jpg (80.38 KiB) Viewed 2392 times

• Locking wheel nuts. I wanted to know what the size / depth / shape of the standard wheel bolts were to pre-order a set of locking wheel nuts. I didn’t ask and waited to get my hands on the car. I marched into Halfords with a removed wheel nut in hand (some strange looks in the car park removing a wheel nut from your own car!) and opted for McGard (https://www.halfords.com/motoring/car-a ... ts-24157su). Don’t forget your copper grease folks!

Locking nuts.jpg
Locking nuts.jpg (129.83 KiB) Viewed 2392 times

• Shock socks / suspension protection bags. If you work for Ariel, please stop reading now. I really wanted these, but at £225 from Ariel, I couldn’t see why Demon Tweaks were able to sell them for £65. I waited to get the car, then measured and ordered. On standard suspension set-up, I went for these https://www.demon-tweeks.co.uk/motorspo ... protectors. 2.5" with 12"-14" at the front and 10"-12" at the rear. If I had to do it again thought, I’d opt for the 3” diameter at the rear. The 2.5” fit OK, but the rear springs are wider than the fronts. Thankfully, extra wide Velcro on the bags saved me. I have easily spent any savings through going my own route on petrol though. Every cloud…

Front socks.jpg
Front socks.jpg (143.97 KiB) Viewed 2392 times
Rear socks.jpg
Rear socks.jpg (149.28 KiB) Viewed 2392 times

• The boot. Thanks for the input from others when researching this topic (viewtopic.php?f=54&t=16987). It really has made a difference to everyday usability, including somewhere to securely store the locking wheel nut and steering wheel, as well as the TomTom for longer periods.

==Broken Bits==

I am ashamed to say that since having the car for almost 2 weeks, I have defaced it quite a bit. Please understand that this was after months of planning and they all seemed like a good idea at the time. I’m still ashamed though…

• Novelty sticker. Warning: the novelty is thinner than the sticker itself…

Shit sticker.jpg
Shit sticker.jpg (157.14 KiB) Viewed 2392 times

• The “don’t touch that” button. OK, so a bit of a story behind this one… The WARN winch comes with a remote control. The remote control sits in a holder that is pop-rivetted to the handbrake centre panel. I was a little uncomfortable that the remote could be removed quite so easily, so set about drilling out the rivet and storing the whole thing in the lockable boot. But of course, that left a hole in the centre panel. What would you have filled the hole with?

Shit button.jpg
Shit button.jpg (170.53 KiB) Viewed 2392 times

• An aerial on my Ariel. When the car was launched, there seems to have been a body coloured aerial attached. This is not an option today. It does seem though that the light bar design still has the hole for such a pointy-up device with the spacing of the 4 lamps tailored around said pointy-up device. I had to fill the hole with something…

Shit pointy-thing.jpg
Shit pointy-thing.jpg (170 KiB) Viewed 2392 times


At this point in the proceedings, it seems I am not allowed to upload any more pics to this post. I'm going to put the kettle on and let the servers settle down for a bit, then I'll have another crack...

Karl V

Re: MY first 750 miles

Post by Karl V » Fri Jul 06, 2018 11:31 pm

OK, let's try and finish this novel...

Where was I? Oh yes, bad bits...

==Stuff I Was Worried About==

• Front number plate. I have opted for a couple of bonnets that have been wrapped. They will continue to be wrapped in various colours as I get bored. The result of this would have been forking out for the front stick-on number plate over and over again and this seemed an undesirable challenge. I am planning to see how long I get away with no front number plate. I have filled the car up 4 times so far at a Tescos, Shell and BP garages and no bother with not checking your front number plate against the national database of petrol stealing yobs. I have also cheerfully driven past a few bored traffic police, and they didn’t want to stop me – even for a chat. How rude!

If push comes to shove though, I reckon I can attach a ‘standard’ front number plate (as opposed to the square rear ones) on the cut outs for the front recovery and winch bar (not the winch itself). Sure, it would cover the winch rope, but if push came to shove, I could carry a front number plate removal tool (AKA screwdriver) with me.

Front bumper.jpg
Front bumper.jpg (145.08 KiB) Viewed 2389 times

• Legality of lighty-up whips. After pestering Henry and a bit of research, I learnt that:
  • White lights should not be seen from the rear of the car, except when travelling backwards (save for number plate illumination light)
  • Red lights should not be seen from the front of the car
  • Green lights are a no-no – reserved for ambulances and other medical emergency vehicles
  • Blue lights are no-no – reserved for police and other emergency services vehicles
  • Ariel did not offer pink, yellow or UV options, so orange was all that remained
Orange lights can be seen from all angles but really should only be used to indicate the direction of intended travel, in a repeated flashing pattern – except in my 5 series BMW from 10 years ago when a permanent orange strip gave my Angel Eyes an eyebrow. So orange it seemed to be.

BMW lights.jpg
BMW lights.jpg (41.99 KiB) Viewed 2389 times

Legislation also states that the for neon lights (which the whips are not – they are LED), the source of the light should not be visible, only the lighting effects are permissible. Well good news – the whips are in two parts. The lower part is the LED light source, wired in through an on/off switch (which is NOT a cigarette lighter!). The whips themselves refract the light source as high (or low) as you want. As I mentioned under the ==Spec==, the gents at Ariel trimmed the height of the whips so that I could get the car into the garage. The whips are just ‘extensions’ of the light source and not THE light source. If that makes sense. Your Honour…

Whips without the whip.jpg
Whips without the whip.jpg (116.69 KiB) Viewed 2389 times

• Glare from roof bar lights. I had read a lot about this over the past 11 months. I’m not sure it is a problem, unless you are proper off-road at night. The roof bar lights are two-fold. 1) DRL rings that come on with the side lights and 2) full on shouty lights that come on with main beam. It is the full on main beam lights that cause the dazzle. By dazzle I mean light the windscreen, picking out every speck of dust on the inside and outside of the screen, that creates the dazzle. I had researched a potential ‘fix’ for this which would have either been some form of cowling at the bottom of the lights; removing 2 or even 4 of the main beam bulbs from the roof bar lights, or replacing the main beam shouty lights on the roof bar with lower wattage bulbs. Removing bulbs seems counter-intuitive, but if the difference is no main beam V full on shouty main beam, bulb removal of the roof bar lights could be an option, and just run on the front main beam lights. Depends I guess on how often you get stuck in a field at night and need to navigate between livestock and trees.

While I am here, the lighting set-up was something I was keen to know more about whilst waiting my turn for delivery. There are 2 switches (assuming the road pack and roof bar lights): 1) main lights and 2) rear fog light.

Main lights – there are 4 positions:

0) All off, although the circuit is constantly live
1) Side lights front, rear lights and roof bar DRLs – no dash indicator
2) Dipped beam front, side lights front, rear lights and roof bar DRLs – no dash indicator
3) Main beam front, side lights front, rear lights, roof bar DRLs and shouty roof bar lights – dash indicator (blue high beam warning)

Side lights.jpg
Side lights.jpg (61.29 KiB) Viewed 2389 times
Dipped beam.jpg
Dipped beam.jpg (83.32 KiB) Viewed 2389 times
Main beam.jpg
Main beam.jpg (61.68 KiB) Viewed 2389 times

Rear fog light – there are 2 positions:

0) Off
1) On, as long as dipped beam is on – switch glows red as a warning

• Getting cold. Quite the opposite at the moment. The side panels are very effective at stopping your nether regions from getting an airing and the hydraulic brake aperture does a good job in wafting heat from the radiator pipes that run under the tub, straight into the cabin. I’ll reserve final judgement on this topic though until the Daily Mail announces the coldest August on record.

==Stuff I Am Still Worried About==

• Getting wet. I picked up the car in glorious weather almost 2 weeks ago and it is still glorious. In fact, the next 2 weeks is supposed to be glorious too. At some point though, it will rain. And get cold. Right now, I am about 80% of the way through a ‘roof /weatherproof’ design. It will be a 4-in-1 set up for sun / light rain on a warm days / cold days with little rain / cold shite rainy days. If you are reading this from outside the UK, you’ll just have to trust me 😉

Work in progress.jpg
Work in progress.jpg (102.02 KiB) Viewed 2389 times

==Stuff I Wasn’t Expecting==

• Cigarette lighter. AKA Auxiliary power supply thingy. I thought this would be a plumbed in power socket thing that I could slip in a USB charging adaptor to. I thought this because I had seen pictures of a ‘thing’ that looked like a cigarette lighter cover near the handbrake. That ‘thing’ is actually the on/off switch for the LED whips. The auxiliary power supply is a separate cable that can be plugged into 2 or 3 dedicated power supply outlet points on the car. Still glad I ticked this option and with this widget ( I now have a set of cables ready to deploy if needed, just not ‘hard wired’ in the car.

• Steering wheel reach. In the Atom, I was driving with arms almost straight out. I was a little taken back by how far out towards you the steering column sticks and, as a result, how close the steering wheel is to your chest. I know that rally style driving tends to opt for ‘wheel in your chest’ style, it just surprised me. I choose the removable steering wheel for security more than anything, but I can see why it may be popular to help gain access to the cabin.

Racing position.jpg
Racing position.jpg (86.57 KiB) Viewed 2389 times
Rally position.jpg
Rally position.jpg (18.09 KiB) Viewed 2389 times

• Owner’s manual. There is one. It is really useful! It shows jacking points, fuse box layout, recommended tyre pressures, recommended suspension settings, recommended oils and running in tips. You won’t be disappointed.

Manual.jpg
Manual.jpg (127.77 KiB) Viewed 2389 times

==Worse Bits==

• The lighting circuit is always live. 2 reasons that this made it to the top spot: an undesirable passer-by could turn on the lights and drain the battery quite quickly (it’s a small battery), but much more likely, I am highly likely to forget to turn off the sidelights / DRLs and drain the battery. In case you haven’t noticed, the lighting circuit is of great interest to me. Just to recap… I like to run the DRLs (which needs the sidelights on) at all times. I also have the LED whips turned on at all times. The DRLs are not only a legal requirement now on all new cars, but are quite common place. the Nomad light bar DRLs look cool (unlike some shite cars that have added an LED strip in the lower front grille – you know who I mean). The LED whips come into their own on tree covered B roads. When parking up and switching off the ignition though, the LED whips shut down but the road lights (side lights / DRLs) stay active. Steve reckons a simple relay to kill power to the lights when the ignition is shut down is a quick ‘fix’ and will see to this at the 500/1,000 mile service in a couple of weeks. Steve will – hopefully – save me from a drained battery due to old age. As light as the car is, I doubt I could bump-start it on my own; let alone live on YouTube or Facebook.

• Persistent clunking over bumps. It is a metallic clattering sound that I first thought was the seatbelt rattle – grommets sorted that one as described above. Then I checked bodywork slap and ‘velcro stripped’ that – as also descried above. I then thought that the issue was coil slap on the tender springs, but a bit of electrical tape showed no signs of wear or did anything to strop the noise. I am currently thinking ‘tub slap’ when hitting larger bumps, but don’t yet have the motivation to investigate further. Steve said that they will have a test drive / investigate further in a couple of weeks at the 1st service.

So that that’s my initial, if somewhat bland, write up of almost 2 weeks / 700 miles of ownership. Most of this write up is what I personally wanted to know 12 months ago. I only hope someone out there finds it vaguely useful, despite the lack of tales of sideways driving or grand touring. That may follow later…

Thanks to everyone here, and on the facebook page (https://www.facebook.com/groups/ariel.club), who has indulged my questions over the past few months. An extended thanks to Henry for putting up with my many questions too. Now that my NOt-so-MAD car has arrived (see what I did there?), I’ll be more than happy to assist others with questions if they arise; especially those on the waiting list desperate to scratch their itch.

Hopefully get to meet some of you folk in person soon.

Happy Arieling.

Karl.

User avatar
John Scherrer
Global Moderator
Posts: 5123
Joined: Sat Mar 07, 2009 1:20 pm
Location: Willington, Bedford UK
Contact:

Re: MY first 750 miles

Post by John Scherrer » Sat Jul 07, 2018 12:01 pm

What a great write up Karl, must have taken you a lot of time to get all this together !

A 'must' read for all Nomad owners.
Atom 3 310 Supercharged (2011), Now Sold

phil4

Re: MY first 750 miles

Post by phil4 » Sat Jul 07, 2018 4:22 pm

Wow, what a great post!

Loads of useful info there, and as an Atom owner, even I've learned a few things, and have a couple of things I'll be trying!

Lighty

Re: MY first 750 miles

Post by Lighty » Sun Jul 08, 2018 4:30 am

Really enjoyed the write up, think you covered most points :)
I guess you will be back at the factory soon for your 1st service.
Hope you get to the cause of the rattle.
My steel underspine lost it’s rubber insulator recently & this made a really bad noise.
Think it was caused by off road use, so guess you have not done this yet.

Karl V

Re: MY first 750 miles

Post by Karl V » Mon Jul 30, 2018 6:41 pm

I'm now 2,000 miles in so wanted to post a quick update on the 'bad bits'.

First off, I really enjoyed visiting the factory again for the first service. Got to speak to the guys in Servicing and annoy them with daft questions. What a great bunch of lads!

Unfortunately, the first service for a Nomad includes checking engine valve clearance, so there wasn't much time to look at my 2 bug bears: side light wiring and a bad knocking over large bumps (although Steve and the chaps did spend quite a while looking at the wiring, we just ran out of time).

I've made a minor adjustment myself to the wiring. Now, instead of the roof bar DLRs turning on with the side lights (which remain on even when switching off the ignition), they come on when the whips are on, which do shut down when the ignition is killed. Sidelights are now just the front and rear lights. The main beam roof bar lights still operate through the main beam switch as before. I'm chuffed; as is my battery ;-)

I think I'm getting closer to working out what the clunking is over large bumps... I've convinced myself that it is the dampers bottoming out on the expansion travel. I'm running the standard non-adjustable Bilstein dampers. When level, I can push the front down 3 or 4 inches before it all tightens up nice and smoothly. If I lift the front, I get an inch, maybe an inch and a half, before the damper rods clunk and movement halts. I haven't tested the back - my weedy arms can't lift an engine and gearbox :-)

I am wondering if the noise is when the wheels drop down after a bump (or going into a rut / hole) deeper than 1 inch. And if the noise is the damper bottoming out violently on expansion, I think I have cause to be concerned (?).

Any experiences from others on this? I'm wondering if an upgrade would cure this. Something adjustable to firm up rebound? Or something with longer travel?

Other than that, I looooove this machine!

Karl V

Re: MY first 750 miles

Post by Karl V » Mon Jul 30, 2018 6:58 pm

Tried to get a brief video of what I'm trying to explain about the suspension noise.

Hope this link works (I think you need to click on the video to get sound)...

https://photos.app.goo.gl/B44fiMxt2CnXkRjJ7

Any advice muchly appreciated.

User avatar
John Scherrer
Global Moderator
Posts: 5123
Joined: Sat Mar 07, 2009 1:20 pm
Location: Willington, Bedford UK
Contact:

Re: MY first 750 miles

Post by John Scherrer » Tue Jul 31, 2018 12:09 am

Yikes! That's not right ..

Can you track down where the noise/clunk is coming from whilst a helper develops their muscles at the front end?

Sounds like that could cause some damage ..
Atom 3 310 Supercharged (2011), Now Sold

Karl V

Re: MY first 750 miles

Post by Karl V » Tue Jul 31, 2018 12:20 am

Thanks again for your input John!

Didn't sound right to me either. Pretty sure it's the dampers bottoming out on the decompression / rebound.

If that is the case, I'm pretty sure they'll fail pretty quickly. Not sure whether to wait for that to happen, or upgrade the suspension before it does.

Damn these UK roads! The Nomad was was my 'old man's' alternative to the Atom.

Like our roads, I'm getting old...

Hedge
Posts: 4206
Joined: Mon Aug 27, 2007 8:18 pm
Contact:

Re: MY first 750 miles

Post by Hedge » Tue Jul 31, 2018 8:19 am

Er, I’m no expert, but surely that ain’t right? I’d call the factory, a bit sharpish, like.

Cheers,
Hedge

User avatar
HenryJS
Posts: 353
Joined: Tue Dec 06, 2016 11:56 am
Location: Sunny ol 'Zummerset.
Contact:

Re: MY first 750 miles

Post by HenryJS » Tue Jul 31, 2018 11:51 am

Please do give Rookie a call Karl - we are your first port of call if somethings wrong!

H

Karl V

Re: MY first 750 miles

Post by Karl V » Tue Jul 31, 2018 12:14 pm

Thanks.

I'm trying to work out if what I'm experiencing is normal or not. I'm a bit of a worrier...

Steve is looking into it :tu:

User avatar
Sir Nick
Posts: 1554
Joined: Tue Sep 06, 2011 2:41 pm
Location: Yate, Bristol, UK
Contact:

Re: MY first 750 miles

Post by Sir Nick » Tue Jul 31, 2018 4:18 pm

Great write up

Needs to go in Ariel.club - admins!!

Karl V

Re: MY first 750 miles

Post by Karl V » Tue Sep 25, 2018 5:59 pm

A quick follow up post on this because I have been asked how I attached the lumbar support cushions to the seat.

The cushion came with an 'extension strap' for fat chairs I guess. I figured out that if I extended the main strap as far as possible, plus attached the extension strap, it was just long enough to hook into the Nomad seat as follows:

1) In through the right hand opening near the lap belt

In through the right.jpg
In through the right.jpg (189.55 KiB) Viewed 2062 times

2) Round the back of the seat to the headrest and loop through to pull the cushion up

around the top.jpg
around the top.jpg (221.22 KiB) Viewed 2062 times

3) Back down behind the seat again before clipping in on the left

Clip on the left.jpg
Clip on the left.jpg (438.28 KiB) Viewed 2062 times

Some shots with the cushion pulled forward and in place.

Cushion folded forward.jpg
Cushion folded forward.jpg (403.52 KiB) Viewed 2062 times
Cushion in place.jpg
Cushion in place.jpg (253.69 KiB) Viewed 2062 times

Hope this helps!

Karl.

phil4

Re: MY first 750 miles

Post by phil4 » Sat Aug 03, 2019 6:57 pm

When having the lightbar fitted, it's possible to have the high-beam separately switchable. This adds an extra small button to the row above the gear lever. The net effect is that when you switch the normal headlight dial to full beam, the 4 spots won't change to high beam, unless you press or have pressed (in which case the centre lights blue, like the winch button) the extra button.

It doesn't solve the glare when you turn them on, and it could be seen as an annoying extra step, but it does mean you can drive along a night on high beam without having the 4 spots on.
FullBeamButton.jpg
FullBeamButton.jpg (159.59 KiB) Viewed 1475 times

Post Reply

Who is online

Users browsing this forum: No registered users and 1 guest