
Rover Head Gasket Failure
-
benyeats
Rover Head Gasket Failure
[quote="wisp"]
HOORAY....
[/quote]
Take it the head gasket arrived ?
HOORAY....
[/quote]
Take it the head gasket arrived ?
-
wisp
Re: Rover Head Gasket Failure
Sure has but I still have not fitted it.
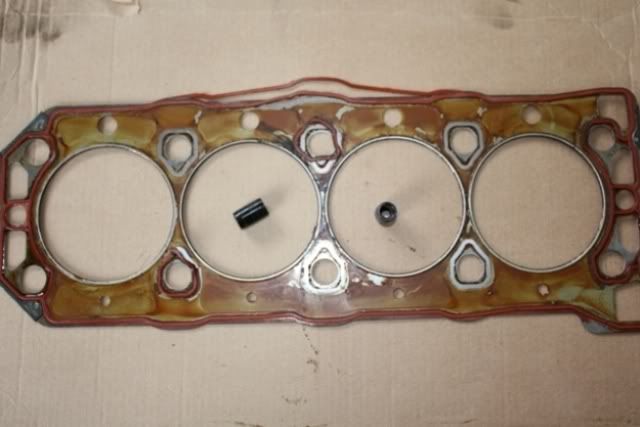
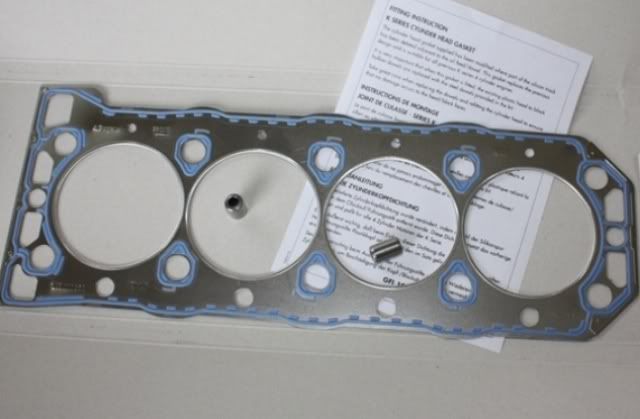
Here are pictures of the old and new....
Here are pictures of the old and new....
-
wisp
Re: Rover Head Gasket Failure
Here's what the head looks like. I'm thinking I can clean it up without the need of having it machined.
[img width=800 height=533]http://i251.photobucket.com/albums/gg307/4Racers/Atom%20mods/IMG_0350.jpg[/img]
You can see where the water made it's way into the cylinder.
[img width=800 height=533]http://i251.photobucket.com/albums/gg307/4Racers/Atom%20mods/IMG_0352.jpg[/img]
[img width=800 height=533]http://i251.photobucket.com/albums/gg307/4Racers/Atom%20mods/IMG_0350.jpg[/img]
![[img width=800 height=533]http://i251.photobucket.com/albums/gg307/4Racers/Atom%20mods/IMG_0350.jpg[/img]](http://s251.photobucket.com/albums/gg307/4Racers/Atom%20mods/IMG_0350.jpg)
You can see where the water made it's way into the cylinder.
[img width=800 height=533]http://i251.photobucket.com/albums/gg307/4Racers/Atom%20mods/IMG_0352.jpg[/img]
![[img width=800 height=533]http://i251.photobucket.com/albums/gg307/4Racers/Atom%20mods/IMG_0352.jpg[/img]](http://s251.photobucket.com/albums/gg307/4Racers/Atom%20mods/IMG_0352.jpg)
-
CalScot
Re: Rover Head Gasket Failure
I would invest in having the head re-surfaced properly. It's the most critical sealed surface in the entire car and it takes the smallest nat's ass of a surface irregularity to create an early failure at that location. Just not worth saving a few bucks in that decision IMHO.
-
Driver
Re: Rover Head Gasket Failure
And just think, a little higher compression (a lot if they REALLY machine it) to boot.  I'm with Peter, get it properly checked out, cleaned up, even consider re-working the valves if there's any serious mileage on the car. It's 9 years of use, likely pushing a lot of that time. There's some really trick coatings they can do for the surfaces of the valves as well. I'd hazzard there are even trickier lightweight sodium filled valves out there somewhere for it if you have the coin. Could even annodize the exterior I guess if you wanted, that'd be different...
Last edited by Driver on Fri Aug 21, 2009 3:22 pm, edited 1 time in total.
-
bolus
Re: Rover Head Gasket Failure
[quote="CalScot"]
I would invest in having the head re-surfaced properly. It's the most critical sealed surface in the entire car and it takes the smallest nat's ass of a surface irregularity to create an early failure at that location. Just not worth saving a few bucks in that decision IMHO.
[/quote]
I believe the proper recommendation is to resurface the block, throw in some steel liners, get some custom forged pistons, rods and crank thrown in there, port and polish the head, get some upgraded valves and springs in there, perhaps look into some new cams after you upgrade the injectors. Remeber the upgraded headstuds as well. Then figure out where you'll stick the intercooler to the new turbo you'll be throwing on there after you install the methanol injection system
You got the engine out of the car. nows the time
-
wisp
Re: Rover Head Gasket Failure
[quote="CalScot"]
I would invest in having the head re-surfaced properly. It's the most critical sealed surface in the entire car and it takes the smallest nat's ass of a surface irregularity to create an early failure at that location. Just not worth saving a few bucks in that decision IMHO.
[/quote]
Rather not. I read somewhere the most you can skim is 0.008" then they are a bin job. I think I'd rather not touch it. Maybe just test for warp with a straight edge. After all it was only the gasket that failed (due to micro movement - plastic locating dowels).
-
wisp
Re: Rover Head Gasket Failure
Thought I'd add some content from emails that contain good technical information.
Question & Answer:
What i would like to know is did you have to use the tools mentioned in the Rover workshop manual?
These quotes are from a few different documents I've looked at....
"Clamp oil rail using head bolts and spacers (Rover 18G 1736). Ensure that bolts used are those originally fitted in that location."
<<ONLY IF YOU INTEND TO ROTATE THE CRANK. WHICH YOU SHOULDNT, BEFORE STRIPPING ALIGN CRANK PULLY TO NOTCH AS SHOWN IN MANUAL>>
"19. Assemble cylinder liner retainer clamps 18G 1736 to cylinder head bolts. Position retainer clamps on cylinder liners ensuring clamps do not protrude over liner bores. Screw cylinder head bolts into oil rail and tighten sufficiently to retain clamps.
CAUTION: Ensure that bolts used are those originally fitted in that location."
<<SAME AS ABOVE, ITS ONLY TO STOP YOU DISLODGING THE CRANK/PISTONS/LINERS>>
"36. Fit tools 18G 1736/1 to cylinder block and secure using head bolts as shown."
You only use three, going by the diagrams.
The tools mentioned are in the top of this photo.....
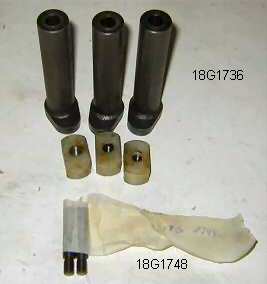
I'm not sure if they are to hold everything in place while the head is of or if they serve another purpose related to the liners.
<<THE OIL RAIL AND CRANK ARE HELD IN POSITION BY SMALL LOCATING BOLTS FROM UNDERNEATH, IF YOU ROTATE THE CRANK THERE MAY BE A PROBLEM AS THE LINERS ARE GLUED IN PLACE AND MAKE BREAK THE GLUE-SEAL IF STRESSED. BASICALLY DONT TURN THE CRANK! WHEN YOU REMOVE THE HEAD YOU WILL SEE ALL 4 PISTONS AT MID WAY IN THE LINERS.
ONE THING I WOULD CHECK IS THAT THE LINERS DONT ROTATE IN THE BLOCK, JUST GENTLY TRY TWISTING THEM, IF THEY SPIN ROUND THEN YOU WILL NEED TO STRIP THE ENGINE. ACTUALLY THE BLOCK ASSEMBLY IS EASIER THAN THE HEADS.>>
Question & Answer:
What i would like to know is did you have to use the tools mentioned in the Rover workshop manual?
These quotes are from a few different documents I've looked at....
"Clamp oil rail using head bolts and spacers (Rover 18G 1736). Ensure that bolts used are those originally fitted in that location."
<<ONLY IF YOU INTEND TO ROTATE THE CRANK. WHICH YOU SHOULDNT, BEFORE STRIPPING ALIGN CRANK PULLY TO NOTCH AS SHOWN IN MANUAL>>
"19. Assemble cylinder liner retainer clamps 18G 1736 to cylinder head bolts. Position retainer clamps on cylinder liners ensuring clamps do not protrude over liner bores. Screw cylinder head bolts into oil rail and tighten sufficiently to retain clamps.
CAUTION: Ensure that bolts used are those originally fitted in that location."
<<SAME AS ABOVE, ITS ONLY TO STOP YOU DISLODGING THE CRANK/PISTONS/LINERS>>
"36. Fit tools 18G 1736/1 to cylinder block and secure using head bolts as shown."
You only use three, going by the diagrams.
The tools mentioned are in the top of this photo.....
I'm not sure if they are to hold everything in place while the head is of or if they serve another purpose related to the liners.
<<THE OIL RAIL AND CRANK ARE HELD IN POSITION BY SMALL LOCATING BOLTS FROM UNDERNEATH, IF YOU ROTATE THE CRANK THERE MAY BE A PROBLEM AS THE LINERS ARE GLUED IN PLACE AND MAKE BREAK THE GLUE-SEAL IF STRESSED. BASICALLY DONT TURN THE CRANK! WHEN YOU REMOVE THE HEAD YOU WILL SEE ALL 4 PISTONS AT MID WAY IN THE LINERS.
ONE THING I WOULD CHECK IS THAT THE LINERS DONT ROTATE IN THE BLOCK, JUST GENTLY TRY TWISTING THEM, IF THEY SPIN ROUND THEN YOU WILL NEED TO STRIP THE ENGINE. ACTUALLY THE BLOCK ASSEMBLY IS EASIER THAN THE HEADS.>>
-
wisp
Re: Rover Head Gasket Failure
Some more....
1) Before you start, align the crank pully marker as stated in the manual.
Doing this puts all 4 pistons midway up/down the bore FOR SAFE KEEPING!
Doing this aligns the 2 markers on the cam sprockets at 3 and 9 oclock(facing each other). This has nothing to do with dissasembly! The 2 markers are required when you REPLACE/REFIT a head with untimmed/disturbed cams.
2) Slacken and remove cambelt tensioner and slide cambelt off the cam sprockets. (be carefull not to drop any little bolts inside the lower cam cover which will still be on unless you remove the pully (theres no need to).
Doing this allows You to move the cams anyway you like, doesn't matter because the valves can't reach the pistons!! That's the KEY!!
REFITTING
You've followed all the usual instructions and now have the head back on the engine. DVA TRICK ' Smear a little grease on the threads and under the heads of the cylinder bolts. Again you can spin the cams to your heart's content. Follow the tightening instructions and torque down to 20nm? And then mark each bolt with tipex or similar to do the 108deg turn followed by the further 180deg turn. You may find that the bolts rotate back a little (this wouldn't happen without grease!) as they twist along their length a little before spring-twisting back; no worries using you maker lines (as per the manual) just nip them up again to align your markers.
TIMMING
Now here's the reason we have markers on the cam sprockets! Rotate the cams until the markers face each other at 3 and 9 oclock (as per the manual). You are now timed. Thats it!!!
The hard part is slipping the cam belt back on, you fingers and thumbs won't shift the crank pully as you grip and yank the belt over the cam sprockets.
The belt wants to be tight on the NON-Tensioner side (obviously!?) It always feels like there's TWO possible teeth that the belt wants to slide on to... Ive found its the tighter (belt taughter) of the 2, the other one always leaves the belt flappy on the NON-Tensioner side.
For the avoidance of doubt: The NON tensioner side is the EXHAUST side. If you can pull the belt taught FROM the crank pully to the exhaust cam pully and slide onto the exhaust pully your good to go.
Many thanks to The JD.
-
wisp
Re: Rover Head Gasket Failure
[quote="wisp"]
[quote="CalScot"]
I would invest in having the head re-surfaced properly. It's the most critical sealed surface in the entire car and it takes the smallest nat's ass of a surface irregularity to create an early failure at that location. Just not worth saving a few bucks in that decision IMHO.
[/quote]
Rather not. I read somewhere the most you can skim is 0.008" then they are a bin job. I think I'd rather not touch it. Maybe just test for warp with a straight edge. After all it was only the gasket that failed (due to micro movement - plastic locating dowels).
[/quote]
Well I polished the head with a nice flat fine stone to remove any debris or marks. The head is true and level (no warp). However, after all my effort there are two small marks caused by corrosion where the old gasket leaked. So the next step is to remove the cams and take the head to a shop for machining.
Also checked the liners. They are not loose and all level. They don't appear to have dropped but if they are proud of the block it appears to be by a gnat's what's it.
-
benyeats
Re: Rover Head Gasket Failure
[quote="wisp"]
[quote="wisp"]
[quote="CalScot"]
I would invest in having the head re-surfaced properly. It's the most critical sealed surface in the entire car and it takes the smallest nat's ass of a surface irregularity to create an early failure at that location. Just not worth saving a few bucks in that decision IMHO.
[/quote]
Rather not. I read somewhere the most you can skim is 0.008" then they are a bin job. I think I'd rather not touch it. Maybe just test for warp with a straight edge. After all it was only the gasket that failed (due to micro movement - plastic locating dowels).
[/quote]
Well I polished the head with a nice flat fine stone to remove any debris or marks. The head is true and level (no warp). However, after all my effort there are two small marks caused by corrosion where the old gasket leaked. So the next step is to remove the cams and take the head to a shop for machining.
Also checked the liners. They are not loose and all level. They don't appear to have dropped but if they are proud of the block it appears to be by a gnat's what's it.
[/quote]
Aren't they supposed to be a gnat's whatsit proud of the block ?
Ben
-
wisp
Re: Rover Head Gasket Failure
[quote="benyeats"]
Aren't they supposed to be a gnat's whatsit proud of the block ?
Ben
[/quote]
I know they are supposed to be proud but I thought it would be noticeable to the eye. You can only tell with a straight edge.
Aren't they supposed to be a gnat's whatsit proud of the block ?
Ben
[/quote]
I know they are supposed to be proud but I thought it would be noticeable to the eye. You can only tell with a straight edge.
-
benyeats
Re: Rover Head Gasket Failure
[quote="wisp"]
[quote="benyeats"]
Aren't they supposed to be a gnat's whatsit proud of the block ?
Ben
[/quote]
I know they are supposed to be proud but I thought it would be noticeable to the eye. You can only tell with a straight edge.
[/quote]
IIRC a knat's whatsit is about how much they should be proud by !
[quote="benyeats"]
Aren't they supposed to be a gnat's whatsit proud of the block ?
Ben
[/quote]
I know they are supposed to be proud but I thought it would be noticeable to the eye. You can only tell with a straight edge.
[/quote]
IIRC a knat's whatsit is about how much they should be proud by !
-
wisp
Re: Rover Head Gasket Failure
Well so much for professional cylinder head re-conditioners.  The fuckin' wanker I took my head to has skimmed 0.51mm (0.020") off my head after me telling him that I did not want the head resurfaced any more than the maximum limit of 0.2mm (0.0078").
Who is online
Users browsing this forum: No registered users and 2 guests