Exhaust Installation.

nickpoore

Exhaust Installation.

Post by nickpoore » Mon Dec 01, 2008 4:59 am

Okay, here are the photos of what I installed.
Basically three pieces...

The header, the collector and the muffler.

Image
Image
Image
Image
Image
Image
Image
Image
Image

Okay, so here I am taking off the old exhaust.
Boy, does it look dirty and old...

Image
Image
Image
Image
Image
Image

The new header sure does look nice - I could not help just putting it up there to see it.
Image
Image
Image
Image

Here I am removing the old header studs, using the double-nut technique.
(Yeah, I just wanted to say "double nut" in a sentance.)
Image
Image
Image

Here I am half way, with everything removed, and about as clean as I'm ever going to see it.
Image

Here is the new gasket.
I'm told that you can re-use these, but for $15, why would I?
Image

I put in a couple of the old studs to hang everything in place while I got the new header bolts installed.
Image

I had to remove the header from the collector, in order to be able to fit everything in.
Image
Image

Here's one of my first problems.
The hose connecting the MASTERLUBE is now really close to the new header.
I'll use a cable tie for now.
Image
Image
Image
Image
Image

Tightening down the bolts - got to love those universal joints for sockets.
Image

Here is the muffler installed for the first time.
One of the nice things is that it just swings open and closed without having to remove it all the time.
Image

Here I have the muffler installed incorrectly, with it hanging underneath the mounting brackets instead of sitting on top.
By mounting the muffler too low, it leans badly - this is corrected later.
Image
Image
Image

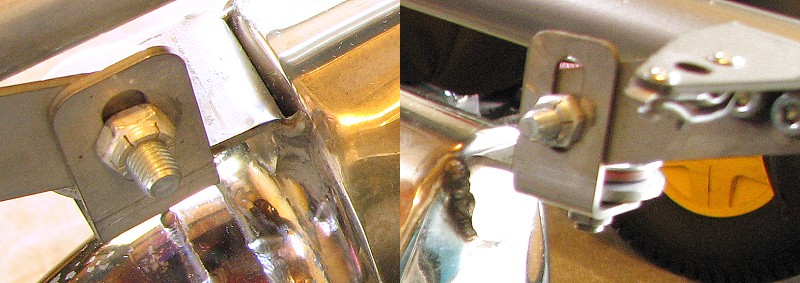
Here you can see my biggest problem.
The OLD muffler hangs from underneath the old brackets, but the NEW muffler sits on TOP of the bracket, not hanging underneath it.
You can also see clearly how the muffler mounting is not horizontal like the bracket it connects to.
I also had issues with the old holes not aligning up with the new ones.
Image
Image
Image

You can see how badly the new muffler bracket does not lie flat with the existing brackets.
(I also took the existing brackets to a machine shop where they converted the existing holes into slots - so that I could fudge where they fit the muffler.)
Image
Image
Image
Image

I don't like how I now have to put the bolts up instead of down, but there is just no room to hang then down the holes any more.
Image
Image

Here is the muffler having come back from it's first run.
It's busy "burning in" with that NEW MUFFLER SMELL.
(This went away after about 30 mintues of driving.)
Image
Image
Image
Image
Image
Image
Image
Image
Image
Image
Image
Image
Last edited by nickpoore on Mon Dec 01, 2008 5:35 am, edited 1 time in total.

Terry Kennedy

Re: Exhaust Installation.

Post by Terry Kennedy » Mon Dec 01, 2008 5:43 am

Nicholas wrote: Here I am removing the old header studs, using the double-nut technique.
Why did you replace the studs? Were the existing ones too short or something?

In this picture:
Image
It looks lilke the vertical exhaust pipe is very close to the frame. Are you concerned about heat damage or rubbing?

nickpoore

Re: Exhaust Installation.

Post by nickpoore » Mon Dec 01, 2008 5:45 am

Okay, so the installation was pretty easy.

My biggest problem was that the muffler did not attatch in the same way as the previous muffler.
In addition, the bracket was not level like the old one.

I took the mounting brackets off the car, and had the old holes converted into slots.
This helped but the fudge factor was not great.
Bottom line is that the muffler does not put too much strain on the brackets, so I'm hoping that this will not be an issue.

As to the SOUND...
The muffler sounds nice.
Almost more subdued, and quieter when driving through my neighborhood.

Next I need to get a full tune...

nickpoore

Re: Exhaust Installation.

Post by nickpoore » Mon Dec 01, 2008 5:50 am

[quote="Terry Kennedy"]
[quote="Nicholas"]
Here I am removing the old header studs, using the double-nut technique.
[/quote]
Why did you replace the studs? Were the existing ones too short or something?
[/quote]

I was told that I should replace the studs with bolts.
I'm not sure if it was a clearnance issue or what.
I understand that ERIC had issues with this step, but will wait for him to clarify in his own post.


[quote="Terry Kennedy"]
It looks lilke the vertical exhaust pipe is very close to the frame. Are you concerned about heat damage or rubbing?
[/quote]
Well, I WASN'T worried about it until you mentioned it.
Now I have to go and buy more stuff...

nickpoore

Re: Exhaust Installation.

Post by nickpoore » Mon Dec 01, 2008 5:54 am

Image
Does this muffler make me look FAT?

Terry Kennedy

Re: Exhaust Installation.

Post by Terry Kennedy » Mon Dec 01, 2008 6:22 am

[quote="Nicholas"]
[Does this muffler make me look FAT?
[/quote]

Any problems with either the removal of the O2 sensor from the old system, or installing it on the new one? Is there a second, plugged tap for an optional wideband sensor?

bolus

Re: Exhaust Installation.

Post by bolus » Mon Dec 01, 2008 6:44 am

[quote="Nicholas"]

Well, I WASN'T worried about it until you mentioned it.
Now I have to go and buy more stuff...
[/quote]

Looks good, thanks for the pics.  get some gold film insulation
http://www.pegasusautoracing.com/produc ... oduct=1838

User avatar
Lane
Posts: 628
Joined: Fri Jan 12, 2007 8:20 am
Location: Northern Midwest - USA
Contact:

Re: Exhaust Installation.

Post by Lane » Mon Dec 01, 2008 7:35 am

My stock muffler brackets look to be a different design (my car is Brammo #094):

Image

These allow a good range of adjustment.

Also - the pipe below the HyTech muffler looks pretty close to the top of the backup lamp and fog lamp.  There is more risk to that plastic than there likely is to the powdercoat.  My clear lens deformed slightly on the top edge after a track event with my new exhaust (pics and topic here, and my muffler/piping isn't as close to those lights as this one looks to be.
Image 300hp Ecotec Atom that is driven.  Visit my website.

nickpoore

Re: Exhaust Installation.

Post by nickpoore » Tue Dec 02, 2008 6:53 pm

[quote="Terry Kennedy"]
[quote="Nicholas"]
[Does this muffler make me look FAT?
[/quote]

Any problems with either the removal of the O2 sensor from the old system, or installing it on the new one? Is there a second, plugged tap for an optional wideband sensor?
[/quote]

No problems with O2 sensor removal/installation.

There is not a 2nd tap, but this thing is custom, so not hard to add.

Heywood-Yablowme

Re: Exhaust Installation.

Post by Heywood-Yablowme » Tue Dec 02, 2008 11:38 pm

Hmmm. Thank you for posting these photos.

ebeck

Re: Exhaust Installation.

Post by ebeck » Wed Dec 03, 2008 12:00 am

I just finished my installation today.  Nicholas did a great job of posting pictures, so I won't post very many.   Below are the small differences or helpful notes with my install:

1. install just the header by itself FIRST; leave the center piece (4 to 1) off for now;  I tried to put the two together and scratched up my frame (it can be done, but it's very tight)
2. I was unfortunate to strip out the engine block holes for the header using the new bolts provided; Dingo helped me out to re-thread these (thank you)
3. next Dingo and I drilled out the header holes just slightly; this probably isn't necessary for all, but the little extra room ensured that I didn't strip the threads again
4. I bent my existing muffler brackets with a hammer and then hung my muffler brackets back in the same location (Nicholas moved them over one hole) with the bolts pointing down
5. I moved my accumulator 1/2" away from the engine by adding large bolts between the accumulator bracket and the engine; this worked well and keeps the muffler pipe from coming in contact with the accumulator
6. many lines / wires were in desperate need of new heat shield tape (the 1500F stuff, Design Engineering)
7. my O2 sensor line (also newly re-wrapped) was re-routed to get away from the muffler/header; I got rid of the bracket holding this line and just zipped tied it to the bottom of the accumulator bracket

Hopefully, this helps future installers.  My wife has the camera, so I will post my pictures later today.

dingo

Re: Exhaust Installation.

Post by dingo » Wed Dec 03, 2008 1:15 am

EBeck's new header was supplied with SS Button head hex machine bolts.  We would recommend not using them. 

It's too easy to cross thread those, as the driver is just a 8mm (was it?) Allen key and you cannot easily judge when you've gone off center.  Then by the time, you've driven that bolt in cross threaded in a half turn, you're stuffed.
 
So Eric got Grade 8 coated hex head bolts and it was these that we used to fasten the header to the exhaust ports after using a tappoing tool carefully into each and every hole.
45 foot pounds of torque and a drop of medium temp Loctite.

By the way?  Honda header flange has five bolts I recall.  Ecotec has ten. 

ebeck

Re: Exhaust Installation.

Post by ebeck » Wed Dec 03, 2008 4:26 am

Picture # 1 of installation...
Attachments
IMG_2685a.jpg
IMG_2685a.jpg (94.05 KiB) Viewed 450 times

ebeck

Re: Exhaust Installation.

Post by ebeck » Wed Dec 03, 2008 4:27 am

Picture # 2 of installation...
Attachments
IMG_2688a.jpg
IMG_2688a.jpg (109.37 KiB) Viewed 450 times

ebeck

Re: Exhaust Installation.

Post by ebeck » Wed Dec 03, 2008 4:28 am

Picture #3 of installation...
Attachments
IMG_2689a.jpg
IMG_2689a.jpg (74.53 KiB) Viewed 445 times

Post Reply

Who is online

Users browsing this forum: No registered users and 3 guests